Electrical Primer -
The Ignition System
Last updated: December 16, 2004
ęBy: John T. Blair (WA4OHZ)
 1133 Chatmoss Dr., Va. Beach, Va. 23464;
(757) 495-8229 1133 Chatmoss Dr., Va. Beach, Va. 23464;
(757) 495-8229
The ignition subsystem of a car is probably one of the least understood items by most
hobbyists. So, in this article, we'll take a look at the parts comprise this subsystem,
and how they work.

Actually 2, 2, 2 pieces in one 
The ignition system can be broken down into two electrical sub circuits, the low voltage
(12V - primary) side and the hi voltage (20,000V+ secondary or output) side. There are a
total of 9 parts in both circuits: the battery, ignition switch, coil, points, condenser,
the distributor cap and rotor, the spark plugs, and plug wire. The article will NOT deal
with the newer electronic ignition modules and computer control circuits.

Why a spark? 
In order for an engine to run, a combustible mixture of gasoline and air (1 part gasoline
to 14 parts air) is trapped in the engines cylinders. The gas is burned causing its volume
to expand and push down on the piston, which in turn rotates the crank shaft and
eventually turns the wheels. Something is required to make the gas burn. A spark!. Each
part of the ignition system has a part to play in generating and delivering that spark to
the correct place (the cylinder) and at the correct time; (as the piston is approaching
the end of its upward motion with the valves closed). When any part fails, the engine will
not run or run very poorly.
This discussion will assume that the reader has a basic knowledge of electricity
theory. If not, it is suggested that you read the article - Electricity primer.

System overview 
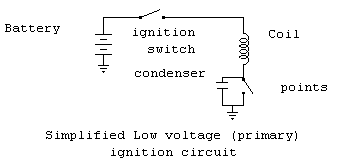 The heart of the primary side is the battery. It stores low voltage (12V) Direct
Current (DC) electricity that the car's systems will draw from when electricity is needed.
The output from the battery is sent to the ignition switch. When the switch is open there
is no complete circuit for the electrons, no current flow, no spark, no bang bang, and the
engine does not run.
When the ignition switch is closed, the electrons can flow along the wire, into and out
of the coil, and to the points. If the points are open, then again the circuit is broken
(opened) and no current can flow. When the points close, the current can pass across the
points to ground, via the metal parts of the distributor, engine block, ground straps, and
back to the battery. Simple!
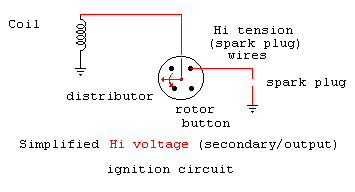 The secondary side is a little harder to understand. Notice there is no
battery! So how does it get any electricity? This is where the coil comes into play. The
term coil is actually a misnomer here, it is really a voltage step up transformer. When an
alternating current (AC) flows in the primary of a coil, a voltage is induced, created, in
the secondary. This secondary voltage is very high, starting at about 20,000V. The secondary side is a little harder to understand. Notice there is no
battery! So how does it get any electricity? This is where the coil comes into play. The
term coil is actually a misnomer here, it is really a voltage step up transformer. When an
alternating current (AC) flows in the primary of a coil, a voltage is induced, created, in
the secondary. This secondary voltage is very high, starting at about 20,000V.
To get this high voltage to the spark plugs another switch is needed, enter the
distributor cap and rotor button. The high voltage enters the distributor via the thick
wire from the coil to the center of the distributor cap. Inside the cap, there is a small
rod that is spring loaded and will rest on the top center of the rotor button. The rotor
button is keyed so that it will stay in place on the distributor shaft. As the engine
turns, so does the distributor shaft, and since the rotor button is physically locked to
this shaft, the button turns also. As the tip of the rotor button goes around inside the
distributor cap, it almost touches the numerous contacts that the spark plug wires are
attached to. If there happens to be any hi voltage present in the wires, as the rotor
passes a contact, the current will flow to the contact and the attached spark plug wire,
in turn.
Now that we have an understanding of the basics lets start looking at some of the parts
more closely and get a better understanding of the theory behind how this all works.

How The Coil works 
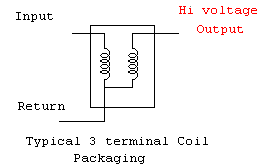 The ignition coil is actually a transformer. Internally it
consists of 2 very long pieces of wire wrapped around some kind of holder (called the
core). (SEE coil experiment at the end of this
article, for more information on coils.) It transforms the 12V from the battery on
it's primary side into the kilovolt-class voltages needed for spark plugs. Most ignition
coils have three terminals: input, return and high voltage. The ignition coil is actually a transformer. Internally it
consists of 2 very long pieces of wire wrapped around some kind of holder (called the
core). (SEE coil experiment at the end of this
article, for more information on coils.) It transforms the 12V from the battery on
it's primary side into the kilovolt-class voltages needed for spark plugs. Most ignition
coils have three terminals: input, return and high voltage.
- The input wire is connected to the ignition switch.
- The return wire is connected to the points which switch the DC on and off.
- The high voltage output is connected in the center of the distributor.
Unfortunately, the DC voltage from the battery can't be increased or decreased by the
coil. However, AC voltage can be. The output voltage can be either stepped up or down
depending on the design of the coil.
It should be noted here that there are both 6V and 12V coils. The main difference
between them is the amount of amplification they performs on the input voltage. For
example: The output of a given coil is to be 120V. If 6V were to be applied to the coil,
it would have to be multiplied 20 times. If 12V were applied to a coil, it would have to
be multiplied only 10 times. This amplification factor and many other parameters go into
the actual design of the coil.
Remember that a plain piece of wire has very low resistance, and the primary of the
coil is just a long piece of wire to a DC voltage. If the ignition switch were in the
"on" position, the engine not running, and the points just happen to be closed;
there would be a complete circuit through the coil to ground allowing for very high
current to flow. Consequently, the coil's primary or the wiring harness would burn up.
Enter the ballast resistor.

Ballast resistor 
To prevent the high current flow, a ballast resistor is installed. Some coils have
an external ballasted. This requires a resistor between the ignition switch and the coil.
Other coils have internal ballast. They have the resistor built into the coil itself.
Again this is another of the design parameters.
A resistor is used to control electron flow and in so doing will cause the voltage to
decrease across the resistor. (Remember Ohms Law, E=I*R; - from the electrical primer.)
The 12V, from the battery, is applied to the input of the resistor. The resistor changes
some of that energy to heat and the output voltage of the resistor becomes less than 12V -
7V for example. So the actual voltage at the input terminal of the coil will depend on
whether there is an external ballast resistor or not. If the voltage is less than 12V
there is an external ballast resistor somewhere. This resistor may be a resistor or
special resistive wire.
On some ignitions systems the external ballast resistor is automatically switched out 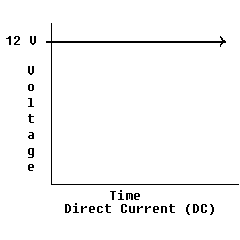 of
the circuit when the car is being started. The rational is that the voltage applied to the
coil will be higher and since the coil was designed for a specific multiplication factor,
the output will be higher. For example: normally 7v applied to the coil. If there is a
multiplication factor of 10 then the output of the coil is 70V. When the input voltage is
allowed to be 12V, with the same x10 factor, the output is 120V or 50v higher. This can be
very helpful in cold weather starting.Most of the British cars of the 50s and 60s had
their ballast resistor built into the coil. I hadn't seen the external resistors, on any
of my British cars, until I started playing with my 77 Spit. of
the circuit when the car is being started. The rational is that the voltage applied to the
coil will be higher and since the coil was designed for a specific multiplication factor,
the output will be higher. For example: normally 7v applied to the coil. If there is a
multiplication factor of 10 then the output of the coil is 70V. When the input voltage is
allowed to be 12V, with the same x10 factor, the output is 120V or 50v higher. This can be
very helpful in cold weather starting.Most of the British cars of the 50s and 60s had
their ballast resistor built into the coil. I hadn't seen the external resistors, on any
of my British cars, until I started playing with my 77 Spit.

The points 
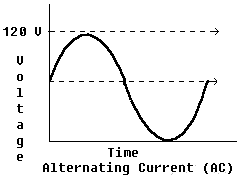 The coil will not work with the DC from the car battery. Some how the DC has to be changed
to AC. That is the job of the points in the older cars (or opto-electronic in the more
modern cars). The points are simply a switch that is turned on and off very fast buy the
lobes on the distributor shaft. This lets the DC start and stop and is called
"pulsating DC". While not true AC it is close enough for the coil. A pulsating
DC signal is very rich in noise as it is composed of all odd harmonic of the fundamental
frequency, (i.e. for a 60 cycle square wavy - pulsed DC - it consists of frequencies of
60, 180, 300, 420, ....).
Once the ignition switch is closed, the primary circuit has voltage, 12V, applied all
the time. The coil's primary return wire goes to the points and condenser. When the 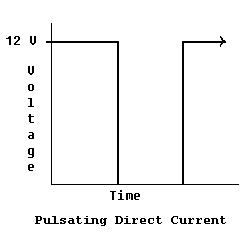 points are open there is NO ground on the coil's primary side and the condenser
is allowed to charge. When the points are closed, it **shorts** out the primary's voltage
to ground and the condenser is allowed to discharge. points are open there is NO ground on the coil's primary side and the condenser
is allowed to charge. When the points are closed, it **shorts** out the primary's voltage
to ground and the condenser is allowed to discharge.

The condenser 
The condenser is another term that is archaic. The modern term is capacitor and their job
is to store electricity. A condenser is simply 2 metallic plates separated by some
material called a dielectric. This dielectric can be made of anything from air to paper,
but it must NOT conduct electricity. Again, like anything else, there are a lot of
parameters that go into designing a condenser and are beyond the scope here.
There is a "Charge time" (time constant) associated with the a condenser. The
charge time must be designed to match the time between required pulses to the spark plugs.
The condenser has 3 basic functions.
- The charging time constant. The cap. hold the voltage charge while the distributor turns
to the point where the spark needs to go (on a V8, less than 1/8 turn on distributor
shaft).
- It passes the AC component of the "pulsed" DC to ground. Remember that stuff
about the odd harmonics. This help reduce Electro Magnetic Interference (EMI).
- Helps reduce the "arcing" at the points to increase points life.
When the capacitor fails, its in one of 2 modes:
- If it shorts out, it acts like a closed switch across the points. Consequently, the
voltage on the primary of the coil can not fluctuate nor induce the higher voltage on the
secondary. The result: NO spark.
- If it changes value, the charge time will change. This will result in the spark being
"out of time" or the magnetic field is not allowed to fully build and collapse
to induce enough voltage at the secondary to fire the plugs. Results: weak or no spark.
The distributor 
The distributor has jobs to perform in both the primary and secondary ignition circuits
and is the most complicated item in the entire ignition system.
In the primary circuit, the lobes on the distributor shaft open and close the points,
helping to turn the DC from the battery into pulsating DC. There will be 1 lobe on the
distributor shaft for each spark plug. In the secondary circuit, the distributor shaft and
rotor button form a large rotating mechanical switch to distribute the high voltage to
each of the spark plugs at the required time. The distributor cap is the static part of
the switch and routes the spark to each plug.
In addition to distributing the spark, the distributor with its mechanical and vacuum
advance mechanisms can change the timing of when the spark is delivered to the plugs.
The distributor cap can collect moisture and or carbon dirt. When this happens, the
high voltage is allowed to travel through the water or carbon dirt to the metal base and
"short" out the distributor. The engine will miss. This can be readily fixed by
removing the distributor cap and wiping it with a clean paper towel.
I have seen in a few rare cases, the rotor button short out. The high voltage line
comes into the center of the distributor to a spring loaded contact. This contact presses
on the rotor button, which sits on the distributor shaft. If the material the rotor button
is made of breaks down, the high voltage is allowed to go through the rotor button and to
ground via the distributor's drive shaft.
To test the low voltage side of the distributor and coil, remove the high voltage wire
from the distributor cap. Hold it near a ground, any metal on the engine block, and have
someone try to start the car. If there is a nice spark everything including the coil is
functioning correctly.
To test the high voltage side of the distributor, simply remove a spark plug wire from
one of the spark plugs and insert a Phillips screwdriver into the connector at the end of
the plug wire. Hold the shaft of the screwdriver near a ground, any metal on the engine
block, while someone tries to start the car. If there is a nice spark everything is
functioning correctly.

Plug wires 
The spark plug wire's job is to carry the high voltage from the distributor to the spark
plug. The modern wire is called "resistive" wire as it has a resistor built into
it and helps reduce engine noise in the cars radio.. This wire is not as strong as the
older copper wire ones. Care must be taken when removing the wires from a spark plug. Do
not pull on the wire itself as this can break the conducting wire inside.

The spark plugs 
The spark plug's job is to ignite the fuel-air mixture in the cylinder. There are many
different type of plugs and "heat" ranges for various applications. But on the
whole, a spark plug is a spark plug.
This ends the basics of the ignition system. I hope this has helped take some of the
mystery out of this system. A more in-depth information on transformer theory follows for
those that are interested.
 Enjoy your Bricklin Enjoy your Bricklin
 John Blair John Blair
The following is a more in-depth look at some of
theory behind the operation of a Coil.
Magnetics 
Scientists found that moving a magnet across a coil of wire would induce (make) a current
flow in the wire. This is the bases of how a transformer works.
To make a transformer a core (something to wind the wire around) is needed. The core is
usually made of soft iron and have any shape. However, the material and shape will
determine how it works in an AC circuit (beyond the scope).
In a DC circuit. When power is applied to the transformer primary a magnetic field will
be established. This building of the field will induce 1 spike across a transformer. To
induce a continual voltage on the output (secondary of a transformer) the magnetic field
must continually build and collapse, build an collapse. This can be achieved by using AC
source or in automotive use - pulsating DC.
In an AC circuit, as the positive half of an AC signal flows in the primary it sets up
a magnetic field around the secondary windings. This will produce 1 and only spike (its
size, duration, and ringing are based on things like the ratio of primary to secondary
windings, RC time constants). When the incoming AC signal starts to flow in reverse, the
initial magnetic field collapses across the secondary and again induces a spike.
Therefore, the output frequency of the coil is the same as the input frequency. Or if you
put a coil (transformer) on a typical 60Hz household circuit, the output will be 60Hz
also.
Since a coil is nothing more than 2 very long pieces of wire, and the primary wire is
relatively large, it has only a few Ohms resistance to DC (from the battery).

Transformer Theory 
Voltage and Current in a transformer are inversely related. The power contained in an
electrical circuit, or consumed by an electrical device is based on the applied voltage
times the current, Power= Current * Voltage (P=I*E).
To paraphrase the conservation of energy, You can't get something for nothing. The best
you can hope for is for the input and output to be almost equal. Therefore, in a perfect
environment, power into a device would be equal to the power out of a device, Pin=Pout. We
can substitute the P=I*E into the conservation of energy equation and get: Iin*Ein =
Iout*Eout. And this can be rearranged to:
    Ein        Iout
    -----  =  ------
    Eout       Iin
This equation, shows that the Voltage and Current across a transformer are inversely
related. That is to say that if the output voltage is increased across a transformer, the
output current is decreased by the same factor. This is why you don't get killed when you
pull a spark plug wire off a running engine. There is enough voltage to cause your muscles
to spasms but there isn't enough current to kill you.
A transformer is nothing more than 2 coils of wire, a primary and a secondary. For a
voltage step up transformer the secondary will have more turns of wire than the primary.
So if you want to multiply the input voltage by a factor of 2, then the secondary will
have to have twice as many windings as the primary. The equation for this becomes:
         Vi   =  Vo
        ---     ---
         Np      Ns
where Vi is the voltage applied to the primary, Vo is the voltage from the secondary Np
is the number of turns (coils of wire) in the primary Ns is the number of turns (coils of
wire) in the secondary

Making a simple transformer - a mind experiment 
Do not actually build this and plug it into a house hold wall socket. If you want a
hands on experiment check with your local electronics hobby store (i.e. Radio Shack) or
library for how to books and experiments on the subject.
To make a step up transformer, we will need 3 items:
- A core - something to hold the wire. A stick or a pencil would be fine.
- A piece of insulated wire about 10 feet long for the primary winding.
- A piece of insulated wire about 100 feet long for the secondary winding.
Take the short piece of wire, lay it over the stick so about 2 inches hanging down.
Wrap the longer end of wire around and around the core until there is about 2 to 5 inches
left. These 2 wires become the primary windings. Take the long wire and lay it on top of
the wire already on the core, leave about 1 foot of wire free. Again wrap the long end
around and around the core until the free end is about 1 foot long. These 2 (1 foot) wire
are the secondary windings. The only reason for having the loose ends different length was
so you can readily identify the primary and secondary side of the transformer. There you
have it, a transformer.
Return to the Index of Tech. articles
| 